12:22 JST, December 10, 2025
The list of visual art mediums that I’m really bad at is long. My pottery “skills” peaked at summer camp 20 years ago, painting is about as foreign to me as contact sports (very foreign), and my 6-year-old draws better Disney princesses than I ever could. The fact that I have forged a career through baking is more representative of my past life as a mathlete than it is some nonexistent talent for creating elaborate sugar structures on multitiered wedding cakes.
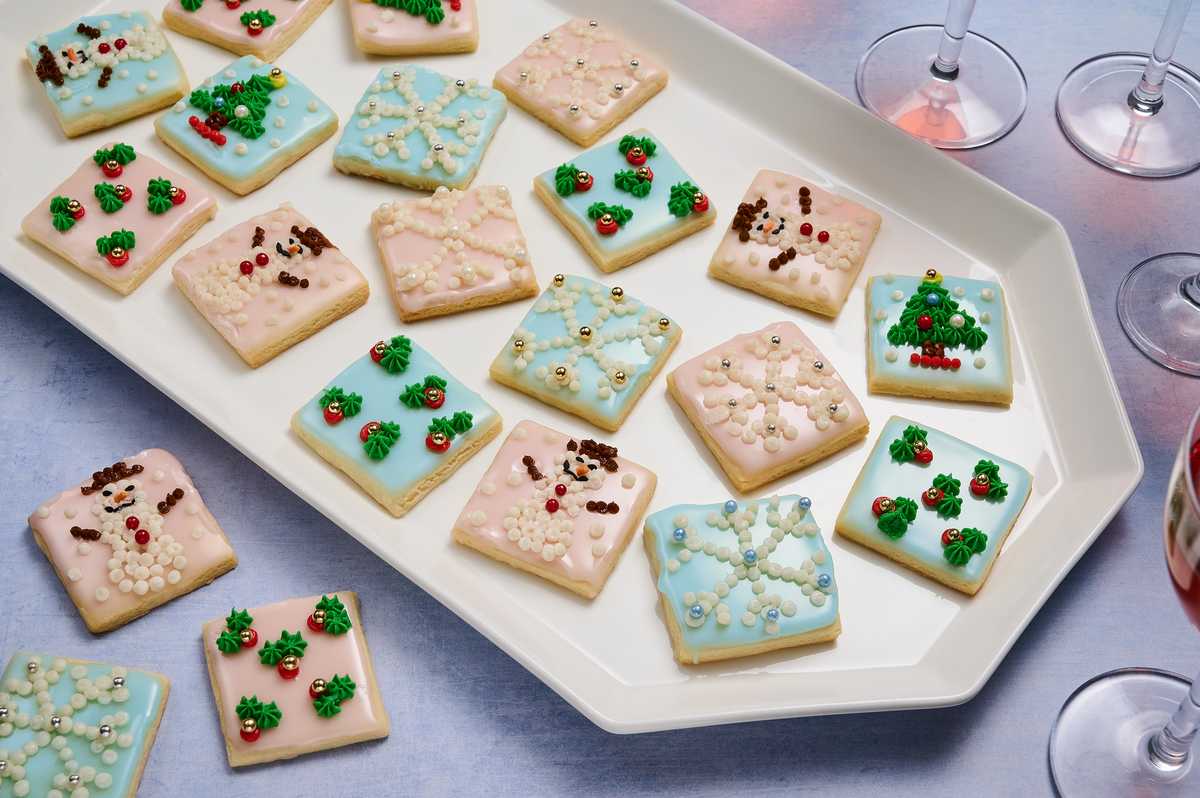
I love baking because I love tinkering with chemical reactions and precise quantities of ingredients to create the tastiest, best, most texturally pleasing eating experience. And, of course, I love eating sugar. But that doesn’t mean I don’t care about aesthetics. Some aesthetics, such as cleanly sliced, uniformly sized brownies with perfect 90-degree corners and cutout cookies that hold their shape perfectly when baked, are easily achievable through math, science and a kitchen ruler. Other than that, when it comes to decorating, I’ve had to think of creative work-arounds for my clumsy, nonartistic hands. I don’t write on cakes with frosting. Instead, I use marzipan and letter-shaped cookie cutters. Fresh edible flowers are worth the splurge. And when it comes to piping frosting, I know my limits. And my limits are dots.
That’s okay! Because about eight years ago, I made the discovery that pointillism artist Georges Seurat made about 130 years earlier: Dots are cool! You can do a lot with dots. Maybe not build a whole “Sunday on La Grande Jatte” (or maybe you can, but I certainly can’t), but I can totally pipe a bunch of dots into a configuration that kind of, sort of resembles embroidery.
I admire embroidery so much for its beauty and timelessness, and it feels extra-special to me because it populates many of the generational farmhouses around where I live in northern Minnesota, including my own. These “embroidery” cookies are the cookies that I’ve made time and time again around the holidays, and they keep my decorating skills from feeling too inferior next to those who bring intricate flooded, royally iced, too-pretty-to-eat gems to the cookie swap. (Not that it’s a competition. Well, actually, the annual swap I go to is a competition.)
The bottom line is: If I can do this decor, you can, too. Whether you want to go full-on Seurat, imitate an ugly sweater, or just do a few blobs and call them Christmas lights, the world is your buttercream dot oyster. All it takes is some time, which you can break up over the course of a few days, and an appreciation for the repetitive motion of piping the same cute blob over and over. One might even consider it meditative. Below are a few of my go-to designs, but feel free to change up the colors and play with your own designs. This is a sit-at-the-dining-table type of decorating project. Involve your kids, take your time and plan for some of these cookies to be extra-embellished and complex, and others to be just a couple of holly berries (like when your hand gets a little tired). All of them will be delicious, though.
The cookies themselves are the ideal version of a classic sugar cookie cutout, perfected: sturdy enough to hold up to decorating, yet soft enough to melt in your mouth. A hint of cream cheese in the dough provides a tanginess that balances out the sugar, and a good splash of almond highlights the true unsung flavor hero of the cookie swap. (Sorry, molasses.) A little bit of lemon juice adds a delightful, complementary sparkle.
Sugar Cookies With Buttercream ‘Embroidery’
Servings: 24-48 (makes 24 to 48 cookies, depending on the size of the cutter)
Total time: 3 hours, plus 3 hours for chilling and setting
Make ahead: The cookie dough can be refrigerated for up to 2 days or frozen for up to 2 months. If freezing the dough, defrost in the refrigerator overnight before rolling out. Baked, unfrosted cookies can be stored in an airtight container in the freezer for up to 2 months. The glaze and frosting can be prepared and refrigerated in an airtight container for up to 3 days in advance. Before using, bring to room temperature and beat the frosting again until smooth. If you have any leftover buttercream, save it to spread on cakes or use as the filling for sandwich cookies.
Storage: The decorated cookies can be stored in an airtight container at room temperature for up to 2 days or in the refrigerator for up to 1 week. Bring to room temperature before serving. They can also be stored in an airtight container in the freezer for up to 1 month; defrost at room temperature.
Where to buy: Gel food coloring, dragées, piping tips and piping bags can be found at craft stores, cake decorating stores and online.
Substitutions: Nut-free? >> Use more vanilla extract instead of the almond extract, or skip it.
To make these gluten-free >> substitute 3 2/3 cups (480 grams) of a cup-for-cup gluten-free flour blend, such as Bob’s Red Mill, for the all-purpose flour.
To make these vegan >> use nondairy butter, cream cheese and milk, and substitute 2 teaspoons apple cider vinegar for the egg. Be sure the sugars and decorations you use are labeled vegan as well.
Variation: Not a big decorator? The plain cookies, with or without the glaze, are just as delightful. If you choose to do just the glaze, feel free to dress it up with your choice of decorations, such as sprinkles or chopped candy.
Notes: You will need five small piping bags fitted with small (1/8 inch/3 millimeters or smaller) round or star piping tips, and a 2-to-2 3/4-inch (5-to-7-centimeter) square or round cookie cutter. The yield of the cookies will vary depending on the size of the cutter you use; a 2-inch cutter will yield about 48, a 2 3/4-inch about 24.
Gel food coloring is more concentrated than liquid food coloring, so adjust how much you use accordingly.
If you’re short on time, you can bake two pans of cookies at once, in the upper and lower thirds of the oven, rotating from front to back and top to bottom halfway though.
If you are planning to pack up or transport the cookies, it’s best to let the glaze and buttercream set overnight.
INGREDIENTS
For the cookies:
16 tablespoons (2 sticks/227 grams) unsalted butter, softened
4 ounces (113 grams) full-fat cream cheese, softened
1 cup (200 grams) granulated sugar
1 large egg, at room temperature
1 teaspoon vanilla extract
1/2 teaspoon almond extract
1 teaspoon baking powder
1/2 teaspoon fine salt
3 2/3 cups (455 grams) all-purpose flour, plus more as needed
For the glaze:
3 cups (360 grams) confectioners’ sugar
3 tablespoons (60 grams) light corn syrup
3 tablespoons (45 grams) milk (any kind), plus more as needed
1 1/2 tablespoons (22 grams) fresh lemon juice (from 1 lemon)
3/4 teaspoon vanilla extract
Pinch fine salt
Liquid or gel food coloring, such as blue or red (optional; see Notes)
For the frosting:
8 tablespoons (1 stick/113 grams) unsalted butter, softened
2 cups (240 grams) confectioners’ sugar
Pinch fine salt
1 tablespoon milk (any kind)
1 teaspoon vanilla extract
Green, brown, yellow and red liquid or gel food coloring, or the colors of your choice (see Notes)
Gold dragées, rainbow candy-coated chips, mini M&M’s, orange sprinkles, black sesame seeds or other decorations of your choice
DIRECTIONS
Make the cookies: In a stand mixer fitted with the paddle attachment, or using a hand mixer and a large bowl, beat together the butter, cream cheese and granulated sugar on medium speed until pale and fluffy, 2 to 3 minutes, scraping down the sides and bottom of the bowl occasionally with a flexible spatula. Beat in the egg, then the vanilla and almond extracts, scraping the bowl down again. With the mixer off, sprinkle the baking powder and salt evenly over the mixture, followed by the flour. Turn the mixer on low, and mix just until no dry streaks remain, about 30 seconds. Transfer the dough to a piece of plastic wrap, pat it into a disk, wrap it up, and refrigerate it for at least 2 hours and up to 2 days.
When you’re ready to bake the cookies, position a rack in the middle of the oven and preheat to 350 degrees. Line two large sheet pans with parchment paper.
Lightly flour your work surface and a rolling pin. Roll out the dough to a thickness of about 1/4 inch (6 millimeters), dusting with a little more flour as needed to prevent sticking. Using a 2-to-2 3/4-inch (5-to-7-centimeter) square or circle cutter, cut out the cookies and transfer to the prepared sheet pans, spaced 1 inch (2.5 centimeters) apart. Reroll the scraps and cut out more cookies. You will not have enough space for all the cookies on the two sheet pans, so you will need to bake in batches. Refrigerate the remaining cookies on a separate sheet pan or plate while you bake the first batch.
Bake, one sheet at a time (see Notes), until the cookies are just set and have the barest hint of brown around the edges; begin checking for doneness at 10 minutes. Let cool on the pans for 5 minutes, then transfer to a wire rack to cool completely. Repeat with any remaining cookies; if you are reusing a sheet pan from the first batch, allow it to cool completely first.
Make the glaze: In a medium bowl, whisk together the confectioners’ sugar, corn syrup, milk, lemon juice, vanilla, salt and a couple of drops of food coloring, if using. (For coloring the glaze, it’s best to go with a lighter color that will help the other colors in the frosting pop. White or beige is great, as is light green, pink – which you can make with a few drops of red coloring – or blue.) Stir in additional milk 1/2 teaspoon at a time until the glaze is the consistency of runny glue. Set a wire rack on a large sheet pan to catch any glaze drips. Dip the cookies into the glaze so it coats the top and sides, let the excess drip off, and place on the prepared rack, glazed side up. Let the glaze set, about 45 minutes.
Make the frosting: In a stand mixer fitted with the paddle attachment, or using a large bowl and a hand mixer, mix the butter, confectioners’ sugar and salt on low speed until you’re confident that sugar won’t fly everywhere, then gradually increase the speed to medium and continue mixing until smooth. Add the milk and vanilla, increase the speed to medium-high, and continue to beat until smooth, an additional 1 to 2 minutes. Scrape down the sides and bottom of the bowl with a flexible spatula as needed to ensure that everything is evenly combined. Remove about 1/4 cup of the frosting and transfer it to a small piping bag (or small zip-top bag with a corner snipped off). Divide the remaining frosting among four bowls (or as many bowls as colors you want for your desired design) and add food coloring to each, a few drops at a time, mixing well to combine, until you like the shade. Transfer each to piping bags fitted with round or star piping tips.
To make a tree design: Using green frosting, and starting in the center of the top third of a cookie, pipe one dot or star, then directly below that pipe a row of two dots, followed by a row of three, continuing on until you have a triangle that takes up the center of the cookie. Below the tree, use brown frosting to pipe a few rows of two or three dots to make the tree trunk, then pipe a wider row of red dots for the tree skirt. Pipe one yellow dot on top of the tree as the star. Before the frosting fully sets, use tweezers to arrange sprinkle or rainbow chip “ornaments” over the green and, if you’d like, a gold dragée on the yellow star so it’s extra sparkly. If desired, pipe white dots in a random arrangement to resemble snowflakes.
To make a snowman design: Using the white frosting, pipe a small circle of dots in the upper third of the cookie. Add a slightly larger circle below that, and a larger circle below that. Fill in the circles with more white dots. Use tweezers to add black sesame eyes and a mouth, and an orange sprinkle “carrot” nose. Use tweezers to place on rainbow chip buttons (or pipe them on with red frosting). Use the brown frosting to pipe little lines of dots coming out of the snowman’s sides as arms, and, for the hat, pipe one brown line across the top of the head and a few shorter lines on top of that. Pipe white dots in a random arrangement to resemble snowflakes.
To make a holly berry design: By now, your hands might want a break, and that’s what this design is for. Pipe slightly larger red dots all over a cookie; you don’t need too many of them, and they can be either randomly or evenly spaced. Use tweezers to place gold dragées in the center of the dots. Use the green frosting to pipe a couple of leaves (with the star or round tip) right next to the red dots.
To make a snowflake design: Use the white frosting to pipe one dot in the center of the cookie, then pipe six dots around the center dot, at the 12 o’clock, 2 o’clock, 4 o’clock, 6 o’clock, 8 o’clock and 10 o’clock positions. Then, from each of these points, add a few more dots to create lines so you have a six-pointed asterisk. From those lines, build out the rest of the snowflake: Pipe additional lines branching off in different directions and in different lengths, ensuring they’re symmetrical. Add a dragée in the center and at the edges of the snowflake, as desired.
Other decor ideas: You are a dot-piping pro now, and it’s time to get creative. To pipe more intricate shapes, take a small cookie cutter and press it into the glaze to form an outline you can follow while piping dots. Stars and dala horses work well. If your hand is really feeling up to it, pipe the entire background with various patterns to make the whole thing look like an ugly sweater. It’s also fun to pipe just one long, looping brown line, then stick on different colored sprinkles or rainbow chips to make it look like string lights.
Nutritional information per cookie, based on 48: 130 calories, 6 g fat, 3 g saturated fat, 19 g carbohydrates, 49 mg sodium, 18 mg cholesterol, 1 g protein, 0 g fiber, 12 g sugar.
This analysis is an estimate based on available ingredients and this preparation. It should not substitute for a dietitian’s or nutritionist’s advice.


Most Read
Popular articles in the past 24 hours
-

3,000 Accounts Posting, Spreading Content Critical of Japan on X;...
-

Milano Cortina 2026: Sakamoto Serves as Flag Bearer; Japan Earns ...
-

My Spendthrift Mother Constantly Asks Me for Money
-
Japanese Students Use Traditional Pickle to Create Novel Wagashi ...
-

‘Dry Bonsai’ Gives New Life to Withered Trees, Allows Free Artist...
-

A Packed Bus Plunges off a Nepal Highway, Killing 19 and Injuring...
-

Dozens of Jewelry, Other Items Stolen After Glass Door, Showcases...
-

1.2 Mil. Rapeseed Flowers Attract Cute Birds, People in Aichi Pre...
Popular articles in the past week
-

Japan PM Takaichi’s Cabinet Resigns en Masse
-

Man Infected with Measles Reportedly Dined at Restaurant in Tokyo...
-

Sanae Takaichi Elected Prime Minister of Japan; Keeps All Cabinet...
-

Japan's Govt to Submit Road Map for Growth Strategy in March, PM ...
-

Bus Carrying 40 Passengers Catches Fire on Chuo Expressway; All E...
-

U.S. Firm to Build Training Hub in Fukushima N-plant for Debris R...
-

Japan, U.S. Name 3 Inaugural Investment Projects; Reached Agreeme...
-

Riku-Ryu Pair Wins Gold Medal: Their Strong Bond Leads to Major C...
Popular articles in the past month
-
Japan PM Takaichi’s Cabinet Resigns en Masse
-

Japan Institute to Use Domestic Commercial Optical Lattice Clock ...
-

Israeli Ambassador to Japan Speaks about Japan’s Role in the Reco...
-
Man Infected with Measles Reportedly Dined at Restaurant in Tokyo...
-

Videos Plagiarized, Reposted with False Subtitles Claiming ‘Ryuky...
-

Man Infected with Measles May Have Come in Contact with Many Peop...
-

Prudential Life Insurance Plans to Fully Compensate for Damages C...
-

Woman with Measles Visited Hospital in Tokyo Multiple Times Befor...
Top Articles in News Services
-

Survey Shows False Election Info Perceived as True
-

Prudential Life Expected to Face Inspection over Fraud
-

Hong Kong Ex-Publisher Jimmy Lai’s Sentence Raises International Outcry as China Defends It
-

Japan’s Nikkei Stock Average Touches 58,000 as Yen, Jgbs Rally on Election Fallout (UPDATE 1)
-
Japan’s Nikkei Stock Average Falls as US-Iran Tensions Unsettle Investors (UPDATE 1)
JN ACCESS RANKING
-
Japan PM Takaichi’s Cabinet Resigns en Masse
-
Japan Institute to Use Domestic Commercial Optical Lattice Clock to Set Japan Standard Time
-
Israeli Ambassador to Japan Speaks about Japan’s Role in the Reconstruction of Gaza
-
Man Infected with Measles Reportedly Dined at Restaurant in Tokyo Station
-
Videos Plagiarized, Reposted with False Subtitles Claiming ‘Ryukyu Belongs to China’; Anti-China False Information Also Posted in Japan